Latest update: April 24, 2025
Securing a position in search results is essential because about 9% of Users Scroll to the Bottom of the First Page. That’s why you have to pay attention to the “Redirect error” alert in Google Search Console.
These errors disrupt Google’s ability to crawl and index your site. Your key pages may be deindexed or ranked lower, which negatively impacts your organic traffic. Fixing these problems will help you preserve link equity and keep your site competitive.
Keep reading and learn what causes this issue and how to fix it!
Main Reasons for Redirect Errors
Redirect errors in Google Search Console happen when Googlebot has issues while following a route from one URL to another. These errors can weaken your indexing and search positioning. They make your pages inaccessible and influence the UX.
You have to understand the main causes of these errors to find the best resolution.
1.Redirect Loops
A redirect loop happens when a URL redirects to another one. Then, it ultimately goes back to the initial URL. Basically, this creates an infinite cycle and leads to ERR_TOO_MANY_REDIRECTS.
Both visitors and browsers can’t get the intended content because of this problem. Common causes for these loops are
- Misconfigured rules in the .htaccess file;
- Incorrect settings in CMS plugins;
- Conflicts between multiple redirects.
2.Redirect Chains
Redirect chains appear when a URL is turned multiple times before reaching the final destination. For example, it may look like this:
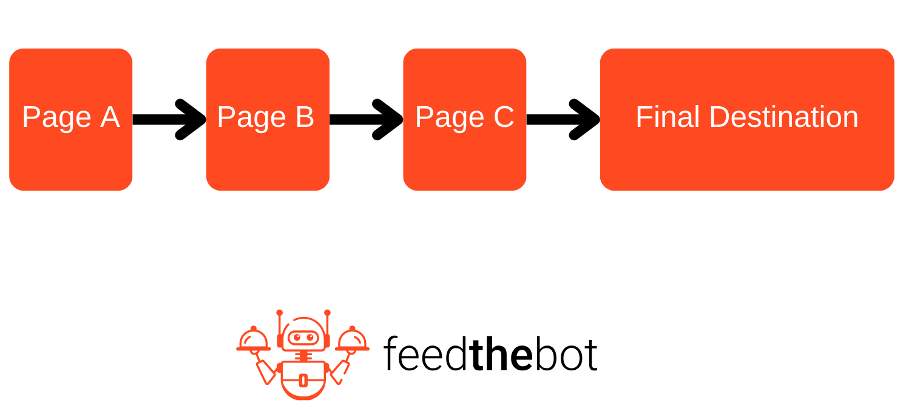
An excessive number of chains can:
- Slow down page loading times;
- Waste crawl budget;
- Lead to incomplete indexing by Google.
This issue typically emerges when you add too many redirects in a row without reviewing current ones.
Actually, Googlebot can follow a sequence of up to 10 redirects before experiencing an error. The situation might change depending on the user agent. Plus, it will disregard any content that is served from an intermediary URL and take only the final one for indexing.
According to Google’s John Mueller, “less than five” is the recommended number of hops in a redirect chain. This is particularly crucial for pages requiring frequent crawling. When redirect chains exceed this limit, visitors may experience slower loading times, negatively impacting user experience and SEO. Keeping redirect hops minimal ensures faster page load speeds and better search engine indexing.
3.Incorrect URL Format
Googlebot may fail to process the URL correctly without proper formatting.
The most common mistakes are:
- Missing URL protocols;
- Malformed domain names;
- Unnecessary special characters;
- Incomplete paths.
Plus, you may confuse the browsers when using relative URLs instead of absolute URLs. Different user agents won’t interpret them right. These formatting errors break the redirect chain and Googlebot won’t reach the final destination.
4.Inappropriate Redirect Type
There are diverse types of redirects. By using the wrong one you can cause SEO problems. Incorrect setup confuses search engines.
For example, 301 is permanent. It informs browsers that your page has permanently moved.
302 indicates the temporary displacement of the page. It may prevent Google from passing ranking signals.
307 is another temporary alternative that behaves similarly to a 302 but retains request methods.
Also, we have meta refresh redirects. They are often discouraged due to poor UX and slow redirection.
5.Redirecting to a Broken or Non-Existent Page
Users and browsers will have issues if a redirected URL points to a page that does not exist. You usually see it as 404 Not Found or 410 Gone.
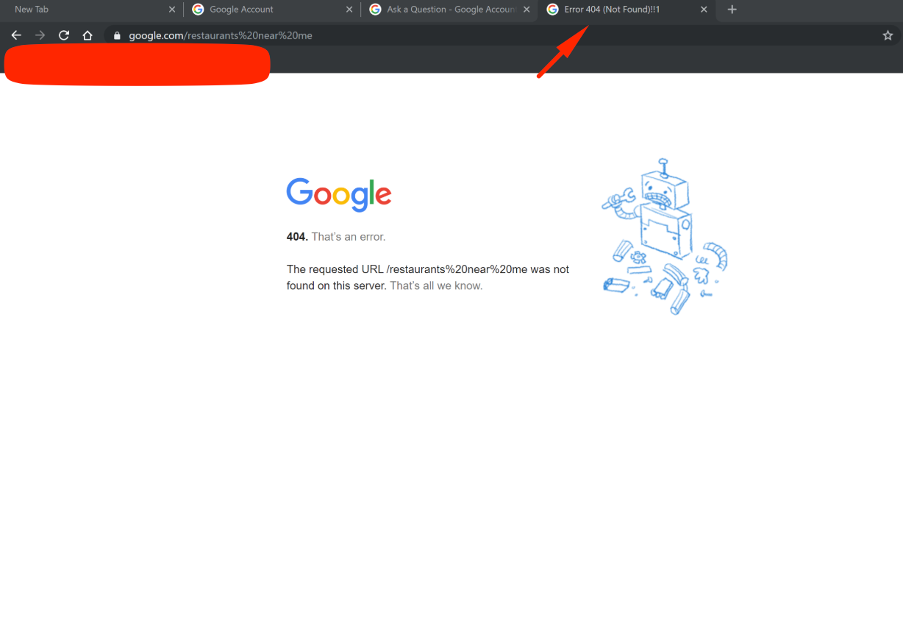
This often occurs when your site structure changes or you delete pages without appropriate forwarding. An incorrect destination may also be a reason for that.
6.Unrelated or Irrelevant Page
Googlebot may flag redirects as errors when they point to irrelevant pages instead of closely related content. It might display some actions as “soft 404”. For instance, it can appear when you reroute an old product page to a generic homepage instead of a similar product category.
7.HTTP to HTTPS Issues
Also, you might have indexing issues if your website has both HTTP and HTTPS versions and improper redirect rules.
For example, some URLs may reroute correctly, while others remain accessible via HTTP. It leads to duplicate content problems.
Misconfigured SSL settings may also be a reason. They can lead to loops or risky forwarding.
8.Robots.txt or Noindex Tags
Browsers may not follow the redirect properly if the URL is blocked by the robots.txt file. Another problem might be the marking with a noindex directive.
This directive can cause indexing issues. It makes the final destination page invisible in search results.
How to Fix “Redirect Error”: Step-by-Step Guide
We’re finally down to the point of fixing the redirect errors. Your first step is to determine why the rerouting isn’t functioning properly.
Start by reviewing the list of impacted pages in the Page Indexing report. This will help you identify patterns and assess the extent of the problem.
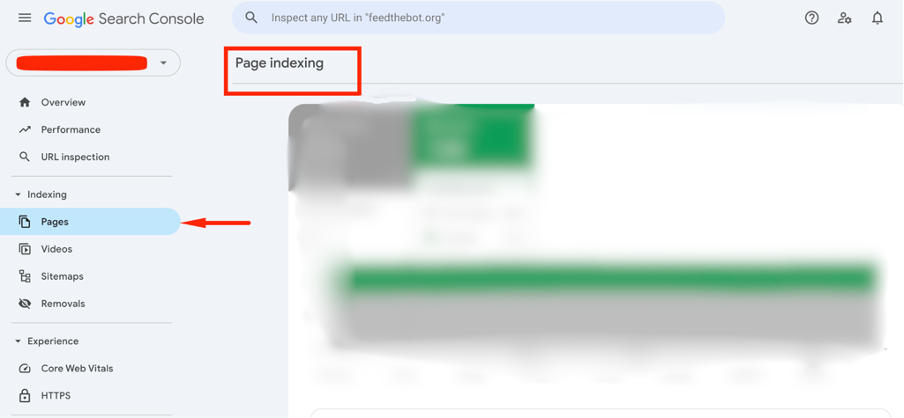
Then go to the “Why pages aren’t indexed” section to find the specific URLs with this error.

Here, you’ll see only the initial URL in the redirect sequence. You’ll need to go deeper to resolve the issue.
So, here are the next steps to follow.
Step 1: Check for Loops
You already know that loops appear when a URL constantly goes between two or more addresses. It stops Googlebot from reaching the final destination.
You can use different online tools or browser extensions to analyze their way and find the root cause.
Also, you might manually test the URL. Enter it into a browser and observe if it reloads multiple times or returns an error message.
Then, review your site’s
- .htaccess file;
- Nginx configuration;
- CMS settings.
Try to eliminate duplicate rules that may be causing loops.
Step 2: Pick the Right Redirect Type
You need to select a proper routing type for correct indexing.
Use the 301 we mentioned above when moving content permanently to a new IP address. This signals the browser to pass SEO equity to the new page.
Use the 302 one only when a transition is temporary.
Here are some other activities you need to complete:
- Modify the .htaccess file for Apache servers;
- Adjust Nginx configurations or CMS settings;
- Test the implementation with Google Search Console’s URL Inspection.
Step 3: Fix Broken or Invalid Redirects
Next, you need to focus on broken redirects that lead to non-existent pages.
Go to the “Page Indexing” report in GSC to identify these issues.
Verify that the target URL exists and loads correctly without errors. If it no longer exists, update the redirect to point to a relevant working page. Or you can remove it entirely.
Also, use 410 status codes for permanently dismissed content if you don’t have a replacement page.
Step 4: Review Robots.txt
Googlebot won’t follow the URLs when they are blocked.
How can you avoid this?
First, test your robot.txt files to ensure it doesn’t have disallow rules for redirected pages.
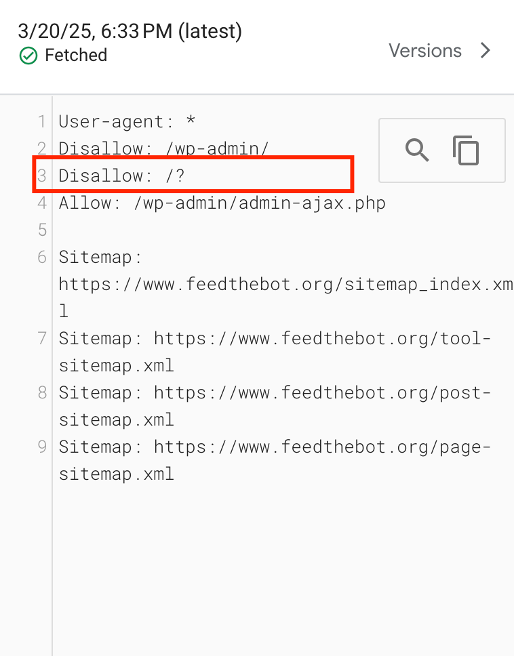
Next, examine page headers and HTML <meta> tags. Make sure there are no noindex and nofollow directives that prevent crawling.
Also, you might use Google’s Inspection Tool to confirm if a page is blocked.
Step 5: Employ Proper HTTPS Redirection
You know that improper redirection when migrating from HTTP to HTTPS can cause mixed content issues.
To avoid that, you need to use a single 301 redirect without turning to an intermediate page.
Also, update canonical tags and sitemaps to reference HTTPS versions of URLs.
Plus, we recommend using the SSL Server Test to verify proper configuration.
Step 6: Update Internal Links
Remember that internal links should always point to the final URL to avoid unnecessary rerouting. It frustrates users and lowers your page speed.
To update them, you need to crawl your website. You might use Screaming Frog or Ahrefs to detect internal links leading to redirected pages.
Also, update internal links in:
- Website’s database,
- CMS,
- Manually in the content (where applicable).
Make sure footer links and sitemap entries reference the correct URLs. Plus, regularly audit internal links to maintain a clean URL structure.
Step 7: Validate the Fix
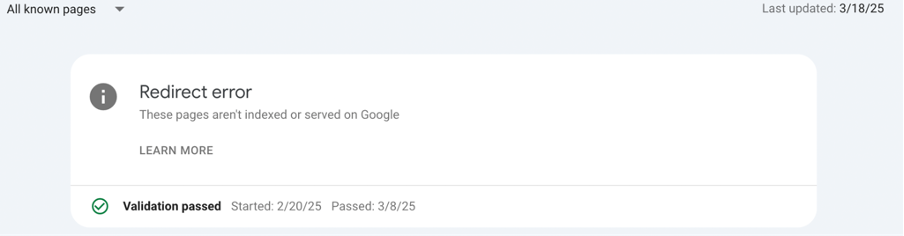
The last step you need to take after fixing everything is validation.
Go to your Google Search Console and open the “Pages” section. Find the URLs that previously had errors and click Validate Fix to notify Google of the updates.
You have to monitor the validation process. Recheck if any problems persist after a few days.
Key Takeaways on Fixing Redirect Errors
- Redirect errors harm SEO by preventing proper indexing, which can lower rankings and organic traffic;
- Redirect loops and chains create unnecessary loading delays and waste crawl budgets;
- Using the right redirect type (301 vs. 302) ensures SEO benefits are preserved;
- Broken or incorrect redirects lead to 404 errors and disrupt user experience;
- HTTPS migrations and robots.txt settings can interfere with proper redirections if not configured correctly;
- Fixing internal links and validating changes in Google Search Console ensures a smooth redirect strategy.
If you encounter other errors, refer to our Google Search Console guidelines to resolve them.